
In the last article I considered using Cloud technologies from Azure as the Cloud Resume Challenge. dictates. But, I decided that I had to do it the hard way. I was going to host every part of the challenge myself. I was still using the IC for hosting the main portion of the Website for now, but all the dynamic stuff that needed processing power and would cost money on a cloud provider was going to happen on-prem instead.
Step 8 - My DatabaseAfter a while the trial version of the Azure database I was going to use ran out so I needed another option. Something that was going to run on my Proxmox cluster at home. I could rely on this database to be online enough to host a public website like a cloud database because I had set up my Proxmox cluster using the built-in high-availability functionality. That means that if any of the nodes should fail, the database would automatically be moved to a different node and restarted. I could still use a noSQL database just like last time, like MongoDB or CouchDB. Or perhaps something else like PostgreSQL or SQLite. It could be whatever I wanted since I am the one in control now! I set up a simple MongoDB for use with my Discord Bot due to its simplicity. The JSON documents were perfect for storing chat history with the bot in a form easy to digest for an LLM. Since this one was just for unimportant chatbot purposes and not for the website I just used the Proxmox community script to set up a pre-made LXC on my Proxmox cluster so I could try it out. It worked just fine for this purpose, but I decided to go with a PostgreSQL server on a VM for the website database; this should prove more versatile. I found pgAdmin and a few others like dBeaver and DBGate. I decided to give pgAdmin a try first. It turned out to be a very intuitive system with an easy-to-navigate UI and easy ways to see users and privileges and run SQL code and scripts all from a handy webUI from any computer in my network. I had to learn about setting up custom users and permissions. Made a user for creating tables and made a pageview table using SQL commands. I made a custom website user that could read and add data to this table only and now my database was ready for the next step!
Step 9 - API and Cloudflare
To communicate with my self-hosted database, I was going to need some sort of internet-accessible API. Luckily I had just the thing! During my side-mission to build my own cloud and AI, I had installed and made a few projects in n8n a low-code automation platform that I was growing to like. It was quite versatile, allowing programming workflows visually with blocks and connectors, and the best part was that it handled credentials and connections to outside tools so I didn't have to program those myself! I could just add my PostgreSQL credentials and local url to the native PostgreSQL node and just like that I could manipulate the database any way I pleased!
First thing to do was set up a webhook to listen for HTTP requests from the website. Then, with the help of my local LLM I added some code that would handle the API requests and translate them to SQL commands to send to the database and then take the results and shape them into the correct format to return to the website. I decided to just have 2 webhooks, one for GET and one for POST to keep the amount of nodes and logic to a minimum.
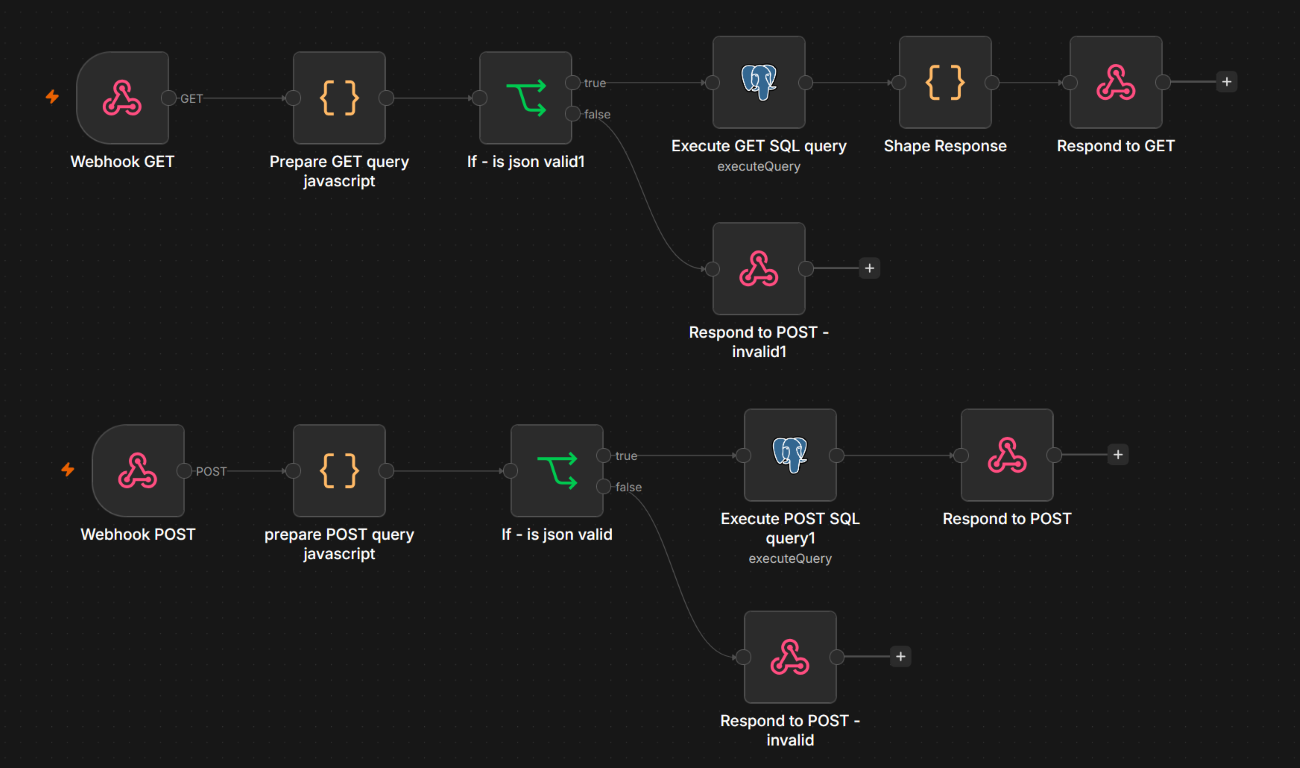 The only thing left was getting it connected to the website. For this part, Cloudflare came in clutch with its many great hosting features in their free tier. I had just completed building my own cloud in order to avoid cloud services, but Cloudflare is just too good to pass up. My n8n instance had internet capability with the help of Cloudflare Tunnels and a Traefik reverse proxy. Cloudflare handled routing internet traffic to my local network safely without me having to open any ports on my network and Traefik handled routing the traffic to the right VM. Then Cloudflare Secrets stored my API key so that I didn't have to store it in the site scripts since it was a Static Website. Then a Cloudflare Worker proxy handled injecting the key into the header so that the key was never visible to the end user in their browser!
All that was left was to update the website JavaScript file. No HTML updates were necessary because the local version of the pageview counter was already in place; all I had to do was make it point towards my new API. I also wanted to keep the current local behavior as a fallback with an indicator when the fallback was used, just in case my n8n API ever went down. I wasn't much worried about it breaking because it was hosted on my high-availability Proxmox cluster at home. If the server ever failed, then another one would automatically start and take over. But I only had one home internet connection and although it was pretty reliable, it was still a single point of failure. I pushed it all to the IC and the hardest steps were done!
Up next on Cloud Resume ChallengeNext up was creating CI/CD pipelines so that I did not have to manually push the website myself every time there was an update. I was looking forward to this part as I had been procrastinating updates just because of the hassle. Continue the journey in Part 5 here: Cloud Resume Journey - Part 5